I recently took on a cupboard makeover project, and it turned out to be much more work than I had anticipated. However, the final result (see here) was definitely worth it—I still catch myself staring at it all the time. Although the color is an acquired taste (my wife chose it), it fits quite well within the house. If you’re thinking about renovating or updating your home’s interior, you might want to consider giving a piece of furniture a makeover—it could really brighten up your space.
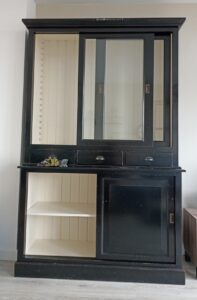
I recently purchased a display cupboard from an online marketplace for a great price (€100) to replace my previous display cabinet. It was somewhat of an impulse buy, as I hadn’t planned on getting one. I’ve seen similar cupboards at friends’ and family members’ homes and always admired them. This one is definitely a stately piece—at 220 x 140 x 50 cm, it was quite challenging to bring it home. Fortunately, it consists of two parts, with the upper section being the largest (up to 130 cm) and heaviest. The reason this cupboard appeals to me so much is that it’s what we call a “landelijke kast,” which is a Dutch term for a country-style cupboard that evokes the charm and simplicity of rural life. It’s simple and sturdy, with an emphasis on functionality. The only downside for me, is that it is black, which darkens my living room—so I knew I needed to repaint it. Also, even though it is not very visible in the figure, there was quite some damage, both existing and from moving it; all the more reason it needed a new paint job.
1. Painting The Outside of The Cupboard
Before I dive into painting, I want to discuss painting techniques a bit more. I’m by no means an expert, and even the final color on the cupboard was chosen by my wife. I did notice, though, that two of my furniture pieces, including the cupboard, now have black paint with a red undertone. A good example of this can be seen on my chessboard table, as shown in the figure on the side. Initially, I thought I had bought an old mahogany table and was preparing to repaint it completely black, but I later discovered that this is a special technique designed to give furniture an antique, aged look. By applying multiple layers of different colors and then partially sanding through the top layer, the piece appears as if it has naturally aged over time, with layers of paint gradually revealing themselves through wear and tear. Some of the terms that might apply to this technique are “distressed paint” and “antiquing.” Let me know in the comments if this is a common technique.
Fortunately for me, the cupboard came with the original receipt, which indicated that it was painted black over a red base coat. That’s how I found out about the technique. While the original color scheme might appeal to some, I needed a lighter color to suit my interior.

Reflecting on my makeover project, I can now see where I went wrong, and I’ve deliberately kept those mistakes in my explanation so you’ll know what not to do.
1.1 Removing all metallic components

If a component doesn’t need to be painted and can be removed, do so—it will make your work much easier. On my cupboard, there were three bronze handles and four other types of handles on the doors. These handles have an elegant appearance and can be quite expensive (up to 47 quid a piece on deVOL).
1.2 Sanding down the original layer and applying a prime coat
Applying the final coat of paint directly without proper preparation will lead to poor results. Firstly, the paint may not bond well and could easily peel off with just a simple touch. Secondly, the original layer may show through your chosen color. If you’re planning to use a light color, it’s important to have a light base layer underneath. Conversely, if you’re using a dark color, you’ll need a dark base layer. Regarding the issue of bonding, a strong paint layer requires a “rough” surface to adhere properly. The black paint on the cupboard was smooth and didn’t bond well, so sanding it down was necessary to create enough texture for the primer to stick effectively.
I used an automatic sander with 150 to 180-grit sandpaper for the large surfaces, which seemed sufficient for preparing the surface. Unfortunately, my sander malfunctioned, and I had to purchase a cheap replacement. For the smaller corners and decorative ridges, I used standard sandpaper. I’ve noticed that I tend to use the same piece of sandpaper for too long, and eventually, instead of sanding, I end up pressing small particles into the wood. I’ve read that this can be detrimental, as it clogs the wood’s pores and reduces adhesion for a new layer of paint. I tried my best to change it regularly.
I chose a white primer for the reasons mentioned above. Initially, I used a brush to apply the primer, but upon closer inspection, the layer appeared uneven. After waiting several hours, I applied a second layer using a roller to achieve a smoother finish. As you might have noticed, I initially left the top surface of the upper part unpainted, thinking it wouldn’t be noticeable. However, later in the project, I realized that the rough, unsanded wood would be difficult to clean, so I decided to prime that surface as well (this was after I had already finished applying the final color).

I used a cheap white primer from the local home depot, and I cannot recommend it for furniture. Do not cut corners when it comes to paint quality, especially if you want the finish to last. In the end, I had to apply two finishing coats because the primer didn’t bond well. Additionally, keep in mind that there is a difference between drying time and curing time. Drying time refers to when the paint is dry to the touch, while curing time involves the paint bonding on a molecular level. This curing process is crucial for the paint to achieve its final hardness, durability, and adhesion. For any additional layer of paint, you must wait the same length of time as the curing period.
Lastly, and perhaps my biggest mistake, I painted over the rails of the doors and windows with the primer. If I had also applied the finishing coat, such a thick layer would have prevented the doors from opening and closing smoothly. This ended up being a costly error, as I had to scrape off all the excess paint. A far better approach would have been to use painter’s tape, which is what I did in the next step.
1.3 The finishing layer - Old Rose
We wanted to paint it with a light & matte color, and my wife came up with “Cosy Taupe”, which is very similar to “Old Rose”, what you find here. The phone pictures don’t do justice to the actual color, so that is unfortunate for the viewers.
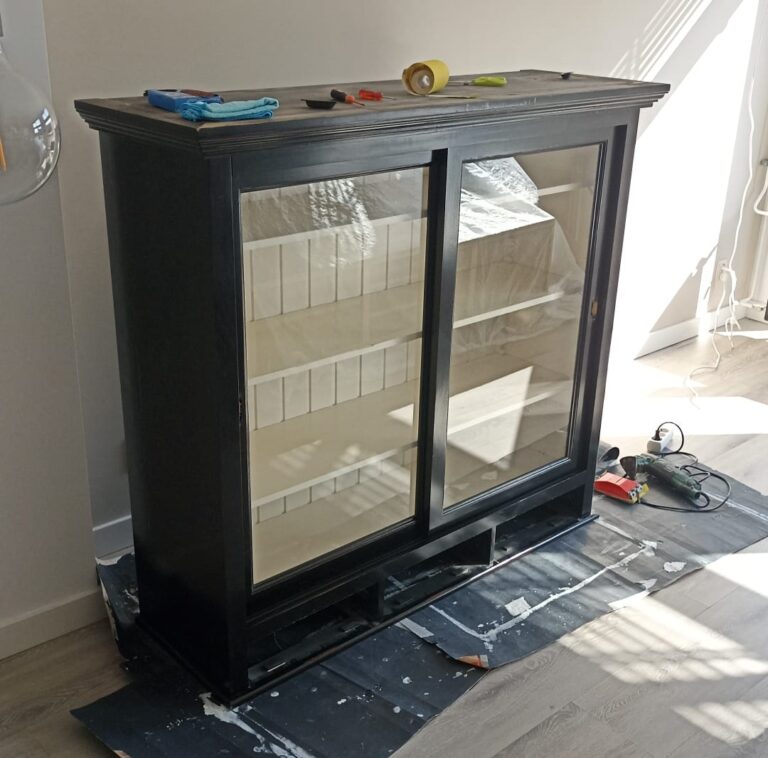
This time I started with the paintroller and it directly gave a uniform coverage. In the figure below you see the first layer, at the moment of taking the picture it was still drying hence you will see darker spots.
I used painter’s tape for the glass windows and rails this time. But even with this precaution, some paint still leaked on it (which I removed with a glass scraper). A single layer was not enough, as the finishing coating wasn’t perfect. I blame this to not having enough daylight and I could hardly see the difference between wet paint and the white primer.

2. Required materials
For this makeover project I used the following tools and materials:
- Large paint brush – €2,00
- Small paint brush – €0,70
- Paint roller tray + roller – €3,00
- Flexa “Strak in de lak” paint – €15,00
- Gamma primer – 15,00
- Sandpaper – €3,00
- Sander – €20,00
- Glass scraper – €3,00
- leftover stuff from other projects like woodfiller, plasterboard, screwdrivers, etc.
This comes to a total of just above 60 euros, and it would have been 20 euros cheaper if my sander didn’t malfunction. I did get one of the cheapest ones I could find, as I hardly use it and this one does the job.
3. The Final result - A Brand New Cupboard
In the end, I think it turned our really well. the original paint is fully replaced with the elegant “Old Rose” color. Unfortunately, the pictures I took, don’t do it justice. It truly looks a lot better in real. In the end I decided not to touch the inside, even though it was chipped and far from perfect. It would look misplaced if it was pristine, therefore, it keeps the old style inside with a fresh new coating on the outside. A picture of the final result can be seen below.

You may also like