


Hi all. In this blog post I will explain how an element’s background can change with a click of a button.
To do this, you just need elementor (or have a basic understand on HTML), without the need for the elementor pro version. Below I give you a very basic example of what it is I will talk about in this post. I want to change the background color of another widget with the use of a button. Give the two buttons a try and see the result. Obviously, this isn’t limited to just coloring the background, but almost anything can be changed with the click of a button.
1. Why do we want this?
It is quite simple, interaction. Websites want visitors to be engaged with the content, preferably through interaction. At the same time, I, as the content creator, do it to make my content more appealing for everyone, including myself. I am not the most creative person, and you will not find flashy widgets on my website. When you click a button, you expect something to happen, may it be a link to another page, or even on the same website.
I started with this topic, when writing my post on resistor color codes and thought it might be interesting to create an interactive post, as similar figures have already been made a thousand times. The idea was to have a background image of a resistor, with rectangular elements that represent the different color bands. The buttons can be used change color in those bands, making it look like an actual resistor. At the same time, I added some logic that automatically calculates the resistance value; hence it is not only for the looks.
2. What do we need?
There are three parts to this story, namely HTML, CSS, and Javascript. They are the three core technologies in web development. For those that use the Elementor plugin, widgets can be used to create anything from buttons, images, carrousel wheels, you name it. These widgets will replace the HTML and CSS coding. However, I will still briefly explain them:
- HTML (hypertext markup language) is used to structure your website. It defines the layout and provides elements, such as heading, paragraphs, links, etc.
- CSS (cascading style sheet) is used to style your website, giving it fonts, colors and even animations. CSS makes your website more appealing.
- Javascript is what gives functionality to your website, and makes it interactive. You can handle events, such as button clicks and more.
In wordpress & elementor, there is a single widget for all three coding langauges. This is the HTML widget (</>), and it should be placed somewhere on the same website as where your buttons are located. The actual widget won’t be visible. The figure below shows how this widget looks like.
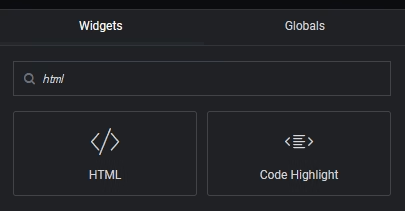
As mentioned, it is possible to use HTML, CSS and Javascript in this widget, given that you use the correct syntax. For CSS you will place your code between <style> </style>, while for Javascript the code should be between <script> </script> to function. HTML code can be added without anything.
Fortunately for us, with the button widget of Elementor, we do not need to work with HTML and CSS anymore (although it is still very possible to do so in Elementor Pro). Similarly, you might want to consider what your target is, in my example above it was a text editor widget, but you could also use a container, a spacer, etc.
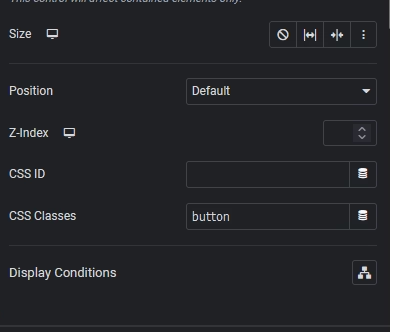
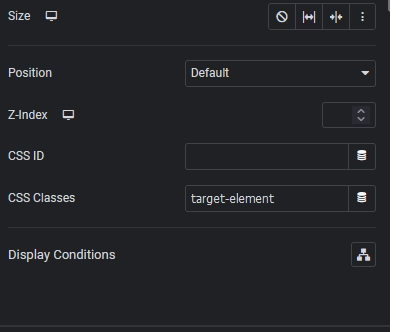
Each element that requires functionality should have its own “CSS Classes” name; which basically labels that element with its unique identifier (in fact CSS ID is the unique identifier, but you can assign one or more classes to any element). This option can be found in the advanced tab of the widget, and is shown in the two figures below.
As you can see, we named the button “button” and the text editor “target-element”.
3. Source file - Change color
In the HTML widget, we write the code. The following code is just to give the rest its functionality, hence we only encorporate javascript in here.
<script type="litespeed/javascript" data-src="https://code.jquery.com/jquery-3.6.0.min.js"></script> <script type="litespeed/javascript">jQuery(document).ready(function($){$('.button').on('click',function(event){event.preventDefault();$('.target-element').css({'background-color':'#093061','color':'#FAFAFA'})})})</script>
Including jQuery Library:
<script src="https://code.jquery.com/jquery-3.6.0.min.js"></script>: This line includes the jQuery library from a CDN (Content Delivery Network). It allows you to use jQuery in your web page.
Document Ready Function:
jQuery(document).ready(function($) { ... });: This code wraps everything inside it to ensure that it runs only after the DOM (Document Object Model) has finished loading. It’s a jQuery shorthand for$(document).ready(function() { ... });.
Event Binding:
$('.button').on('click', function(event) { ... });: This line selects all elements with the classbuttonusing the jQuery selector$('.button'), and then attaches a click event handler to them using the.on()method. When any of these elements are clicked, the function inside the second parameter will be executed.
Prevent Default Action:
event.preventDefault();: Inside the click event handler, this line prevents the default action of the event from occurring. In this case, it prevents the default action of clicking a button, which is to submit a form or navigate to another page; this will reload the page and automatically scrolls it to the top.
Changing CSS Properties:
$('.target-element').css({ ... });: This line selects all elements with the classtarget-elementand changes their CSS properties using the.css()method.background-color: '#093061': Sets the background color of the selected elements to#093061.color: '#FAFAFA': Sets the text color of the selected elements to#FAFAFA.
In summary, when any element with the class button is clicked, the script prevents the default action, and then changes the background color and text color of all elements with the class target-element. This allows you to change the appearance of the targeted element on your webpage when a specific button is clicked. As mentioned before, this isn’t limited to just colors. As a final tip, I found ChatGPT to be an excellent source to find out what is possible, when you have an already working script.

Florius
Hi, welcome to my website. I am writing about my previous studies, work & research related topics and other interests. I hope you enjoy reading it and that you learned something new.
More Posts