
Why I Built This Automation
As a solo author, I don’t have time to constantly create social media posts to promote my website. I know that growing an audience requires broader outreach, but manual posting just isn’t realistic for me. That’s why I built this small automation project: with a single click, I can generate and publish social media posts for each new article.
A quick note, because my social media presence is largely automated, I won’t be very interactive on those platforms. I might pop in from time to time and respond, but for questions or discussions, it’s better to contact me on my website.
In this article, I’ll explain the motivation behind this tool and how it works. If you’d like to use this for your own automation, you’ll need your own credentials. To get started with the installation, you can head straight to the GitHub repository. This setup works with X (Twitter). At the bottom of this article, I will briefly mention a 2nd version I created, that includes more social media automation. Both work very similarly, but to explain it well, I will dive into X post automation only.
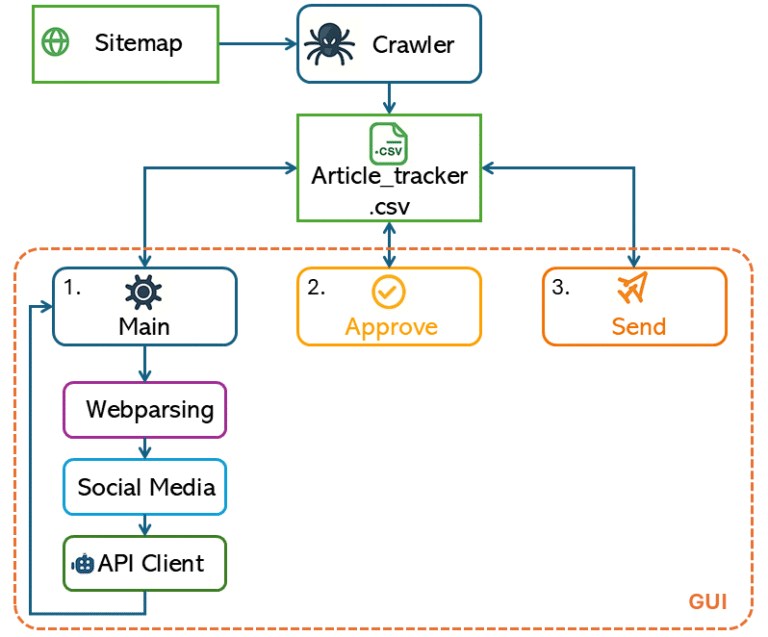
Figure 1 provides a high-level overview of how the program works. At the center is article_tracker.csv, which acts as a lightweight database—each module reads from or writes to this file. The workflow starts with the crawler, which scans the website’s sitemap and populates the tracker with article URLs.
For each article, the program generates a 240-character tweet (for X/Twitter) and a LinkedIn post of up to 2200 characters using a combination of SocialMedia script and the API Client. To maintain quality and control, posts aren’t published automatically: there’s an approval step where you can review and edit each draft before it goes live.
Since my own credentials are private, you’ll need to create your own configuration file (as described in the GitHub README) with your API keys and the sitemap URL for the crawler. The API client in this project currently uses GPT, but you can change it to work with Gemini, Grok, Claude, or any other AI provider by updating the relevant code. In the next sections, I will go deeper into each different script.
Step 1: Crawl Your Website
I started with downloading my site’s sitemap and and directly parsing it, making it easy to search for article links. This is much more reliable and scalable than maintaining a manual list of article URLs.
					for loc in soup.find_all("loc"):
     url = loc.text.strip()
     if "/wp-content/" in url:
        continue
     if url.lower().endswith(('.jpg', '.jpeg', '.png', '.gif', '.svg', '.webp', '.pdf', '.mp4', '.zip')):
        continue
     urls.append(url)
This section of the code loops through every link in the sitemap, but skips anything that looks like an image or non-article file. This keeps the tracker focused only on content we actually want to post about—reducing clutter and preventing errors later. And finally, the “init_tracker” sends the filtered list of article URLs to a central CSV. This CSV is the backbone of the entire workflow, letting every other script know what articles exist and what their current status is. Using a CSV is simple, easy to update, and avoids bugs from “out of sync” data between scripts. Automatically finding new articles means the workflow always stays current, reduces manual errors, and requires very little ongoing work.
The CSV Tracker
The CSV article tracker acts as the central database for the entire workflow, keeping a record of every article and its status. All information about what needs to be processed, approved, or sent is stored there. The tracker.py module is responsible for reading from and updating this CSV, making sure that all the Python scripts communicate through a single, reliable source of data. This setup keeps everything in sync and avoids confusion between different steps in the process.
Article_tracker.csv
Each column in the CSV corresponds to a particular stage or status for each article and platform. For example, the columns named twitter_post and linkedin_post store the filenames of the generated social media posts for Twitter and LinkedIn. The columns twitter_approved and linkedin_approved indicate whether each post has been reviewed and approved for publishing. Similarly, twitter_uploaded and linkedin_uploaded track whether those approved posts have actually been published or sent out.
Every row represents a single article URL, so you can quickly see the progress for each article across all supported platforms. This clear structure makes it easy to check, at a glance, which articles are still in draft, which are waiting for approval, and which have already gone live on each platform.
Step 2: Parse and Generate Posts
The main.py script coordinates the process of generating social media posts for your articles. It works by checking the CSV tracker for articles that still need posts on certain platforms. For each missing post, it uses the webparsing module to open the article’s URL and extract the main content from the webpage—making sure only the relevant text is used. Next, the extracted article text is passed to the socialmedia module, which formats a prompt that matches the style and requirements of each social platform (like Twitter or LinkedIn).
With the prompt ready, main.py then calls the APIClient to send the prompt to a language model, which writes a unique social media post based on the article’s content and the chosen platform’s style. The script saves the generated post to a text file and updates the tracker CSV so that every step is recorded and nothing gets missed.
A key section that brings all these steps together is:
					post_data = extract_page_data(url)
prompt, temp = get_social_prompt(platform, post_data['main_text'])
post_text = ask_gpt(prompt, temperature=temp)
This piece shows how main.py extracts the content, prepares a tailored prompt, and generates a social post in sequence—ensuring that every platform gets a customized, up-to-date message drawn directly from your article.
Step 3: Review and Publish
The approve and send steps handle the quality control and publishing side of your workflow. After posts have been generated, the approve script checks the tracker for any new posts that haven’t been reviewed yet. It presents these posts for manual approval, giving you a chance to read each one and decide whether it’s ready to be published. If you approve a post, the script marks it as such in the CSV; if not, it can be skipped or denied and removed from the queue.
Once posts have been approved, the send script takes over. It scans the tracker for all posts that are marked as approved but not yet uploaded or published on their platforms. The script then handles the actual publishing—such as uploading the posts to Twitter or LinkedIn—and finally updates the CSV to indicate that the post has been sent, ensuring everything stays in sync.
A key part of this workflow is the approval action, where your decision is recorded:
					if action == "a":
    set_post_approval(url, platform, True, tracker_file=TRACKER_FILE)
    print("  Approved.")
This snippet shows how an approval from the reviewer updates the tracker, making sure only reviewed content is allowed to move forward for publishing.
Unified GUI Control
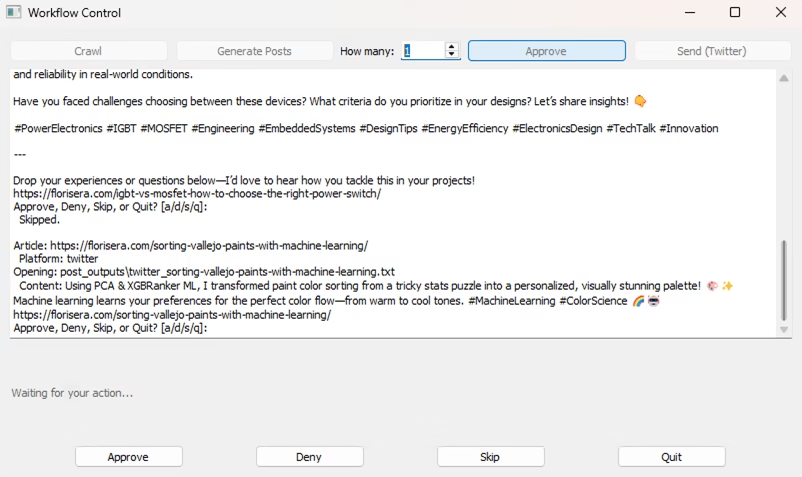
Initially I used main/approve/send python scripts individually, this was again time consuming. So I created a GUI to make everything more smooth. This can be seen in Figure 3. The GUI can be called using “python GUI.py”. The workflow is now much smoother and easier to use, especially during the approval step. Previously, when you needed to approve, deny, skip, or quit, you had to write a/d/s/q. Now, the action buttons (“Approve”, “Deny”, “Skip”, “Quit”) are always visible at the bottom of the window, but they are only enabled when a decision is actually needed.
This GUI approach keeps the process intuitive and efficient—there’s no need to deal with extra popups, and you always know what actions are available. The main code that controls this behavior is simple:
Lessons Learned and V2
The GUI is the cherry on top, it brings everything together into one streamlined interface. While it’s not the most visually polished, it does its job well: creating and sending posts directly to Twitter and other platforms with minimal hassle.
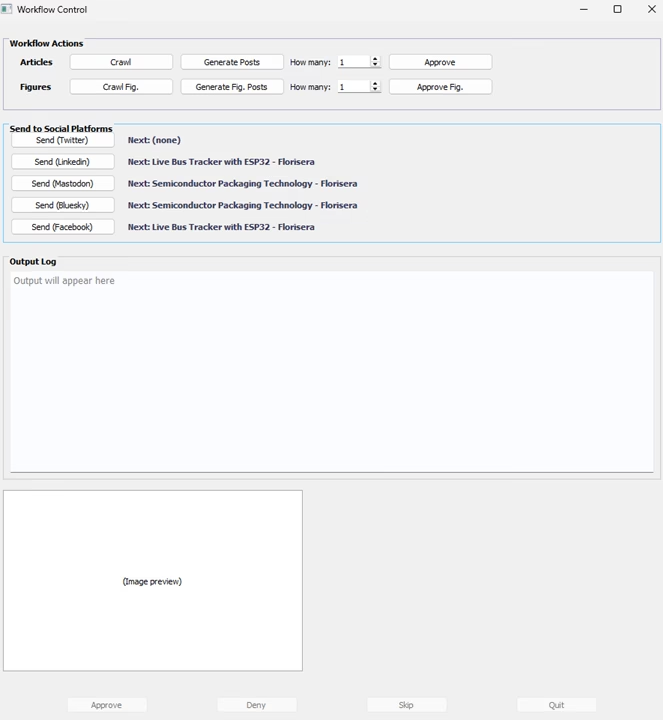
Working on this project taught me the importance of planning ahead. By designing the system modularly, I could easily integrate new platforms like Bluesky and Mastodon, just by updating the configuration and adding a small handler for API settings. Even Pinterest, which required a different workflow due to multi-image support per article, was manageable thanks to this modular approach. Explaining this would not be suitable for this article. However, the version 2.0 code and how to set it up can be found on my Github page here. A figure how the GUI v2.0 looks like can be found at the bottom of this page.
Overall, I learned that investing early effort in structure pays off later. I’m glad to say the current setup makes future expansion straightforward. While doing all of this, I found out that there is a program calld n8n, which helps in automation. I felt it is similar to LabView. Maybe in the future I’ll take a look and see if it is possible to work with that. If you have any questions, please feel free to post them here.
Florius
Hi, welcome to my website. I am writing about my previous studies, work & research related topics and other interests. I hope you enjoy reading it and that you learned something new.
More Posts