Introduction
Imagine you’re waiting for the bus, but you don’t want to open an app, or refresh another one of those websites, all you need is a small display in your kitchen or workdesk showing the next buses for your stop, always up to date. That’s exactly what I set out to build with a simple ESP32 microcontroller, an LCD display, and real-time data from the Dutch OVapi service. Nowadays, apps are everything, but it can be quite fun and rewarding to have a small old-school screen telling you the expected arrival times.
In this blog, I’ll walk you through my project: a DIY live bus departure display that connects to WiFi using the ESP32. It fetches public transport data automatically, and shows the next arrivals at your favorite bus stop. You’ll see how anyone can set it up for their own stop (based in the Netherlands). I’ll break down the hardware, the smart setup process with WiFiManager, and the code that keeps your display updated—every minute, hands-free.
I’ve uploaded all the files on GitHub/BusTrackingWithESP32. The libraries that are not on GitHub, can be found in the “Library Manager” in Arduino IDE. For questions, just ask.
Hardware (ESP32) & Assembly
The ESP32 does all the heavy lifting here: Wi-Fi, microcontroller, and GPIO rolled into one low-cost board. There are plenty of variants (this site gives a handy lineup), but for this build I stuck with the plain ESP32 NodeMCU dev-board: cheap and good enough. Newer chips like the ESP32-S3 add extra pins and features, yet the basic wiring is identical. Even if your board’s header order is shuffled, the pin names are consistent, so following the schematic will still work.
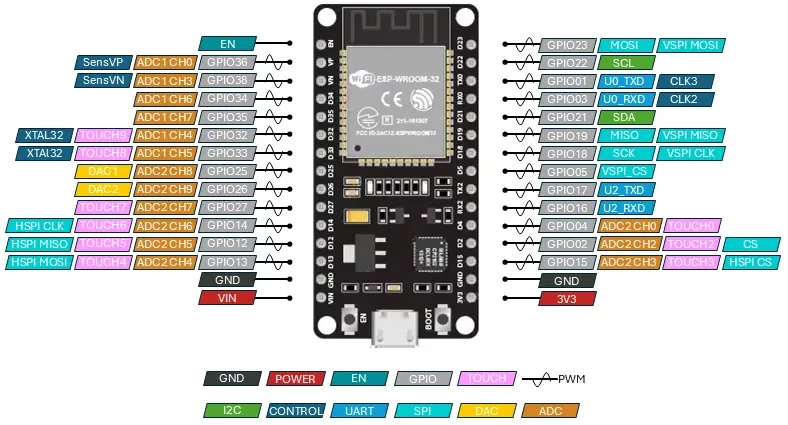
Figure 1 shows the ESP32 pin map. Because the LCD uses I²C we only care about the SDA and SCL lines; everything else can stay free for future add-ons. I’ve grouped similar pins in the diagram so you can see at a glance which ones handle I²C, SPI, ADC, UART, power, and more.
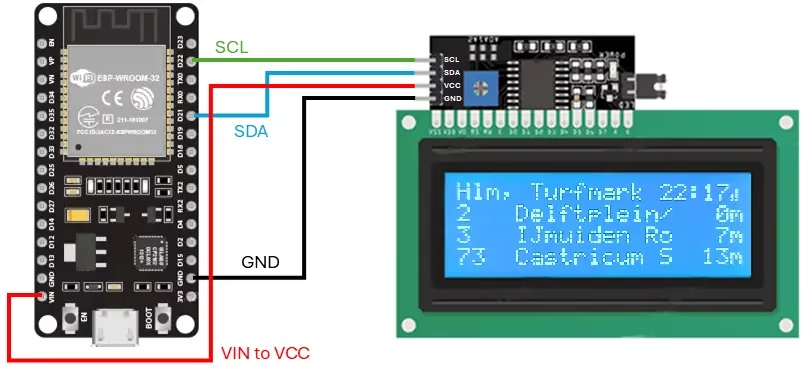
To run this project you need only three things: an ESP32 dev-board, a 20 × 4 LCD that already has the little I²C backpack soldered on, and four female-to-female jumper wires. Without the backpack you would have to drive the LCD in parallel mode and sacrifice six extra GPIO pins—this code is written for the I²C version only.
| ESP32 pin | I²C LCD backpack pin |
|---|---|
| Vin (5 V) | VCC |
| GND | GND |
| GPIO 21 | SDA |
| GPIO 22 | SCL |
Figure 2 shows the finished wiring: the ESP32 powered from a USB cable, four jumpers running to the backpack, and the LCD’s blue back-light enabled by the factory-installed LED jumper.
Wire everything up, plug the ESP32 into your computer, and if your board uses the common CP2102 (or CH340) USB-to-UART chip, install its driver so the IDE can see the port. Select that COM port in Arduino IDE, hit Upload, and a few seconds after the board reboots the bus times should light up on the LCD.
Smart Setup and Personalizations
Before diving into the code, it helps to see the startup sequence at a glance. Figure 3 walks through everything the ESP32 does between power-on and its first data update: The boot flow, the clock synchronization and than starting the main loop.
As a quick reminder, I am using a few dutch words in my code, such as “Halte = bus stop”. I hope that maybe this is a good time for you to learn dutch, but all my comments are in english for you to read along with. Furthermore, any bus stop can be found on www.ovzoeker.nl, by clicking on the bus stop of your choice, and copy paste the 8 digit code into the “tpc_code_buff”.
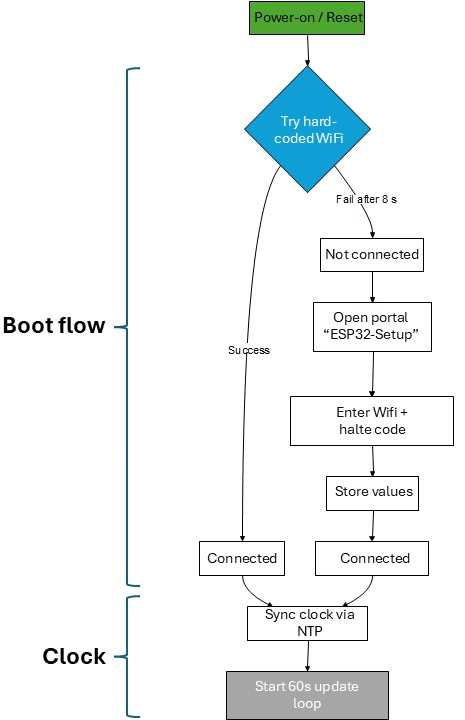
Boot Flow
The setup routine is made to get the ESP32 online at home, but also anywhere else, without having to re-flash it. It starts with the hard-coded SSID and password, because for myself that is the fastest way. An eight second timeout keeps the boot sequence from hanging forever, if the hard-coded credentials are invalid.
If the hard-coded login is successful, the sketch keeps its default bus stop (halte) code, and goes straight to work. If it fails, the code moves to the WifiManager library. The ESP32 launches its own access point called “ESP32-Setup”, so that anyone with a phone or computer can join and pick a new network, fill in a password and enter a new bus stop (halte) code.
It stores this halte code, and closes the portal and continues with connecting to its new internet and a new default halte code. The function than continues with a one-off NTP synch, to update the time, and starts by pulling the very first set of bus arrivals.
char tpc_code_buf[16] = "55000160"; // Default haltecode / bus stop code

void setup() {
  Serial.begin(115200);                 // open USB serial for debug
  delay(1000);                          // give USB host a moment

  /* -------- 1. try the built-in Wi-Fi credentialst.....

  Not shown here

  /* -------- 2a. success path: we’re already online ---------------- */
  if (WiFi.status() == WL_CONNECTED) {
    Serial.println("\nConnected via hard-coded Wi-Fi");
    tpc_code = String(tpc_code_buf);    // keep the default bus stop code

  /* -------- 2b. fallback: launch the captive portal --------------- */
  } else {
    Serial.println("\nHard-coded Wi-Fi failed → starting WiFiManager");

    WiFiManager wm;
    wm.addParameter(&custom_tpc_code);  // extra text box for bus stop code

    /* blocks here until user joins “ESP32-Setup”, enters creds,
       and hits Save. */
    if (!wm.autoConnect("ESP32-Setup")) {
      Serial.println("Portal failed → reboot");
      delay(3000);
      ESP.restart();
    }

    Serial.println("Connected via WiFiManager");
    tpc_code = String(custom_tpc_code.getValue());   // user’s halte code
    Serial.print("Set halte code to: ");
    Serial.println(tpc_code);
  }

  /* -------- 3. clock sync + first data pull ----------------------- */
  setupTime();                        // NTP once at boot
  updateOVapi();                      // grab initial departures
}
Clock & NTP Synch
After the ESP32 is online the very first task is to set its internal clock.
That happens only once, right at power-up, via setupTime() from time.h. Inside that function I call:
/* ---------- Clock sync ---------- */
void setupTime() {                                        // call once in setup()
  configTime(3600, 3600, "pool.ntp.org", "time.nist.gov"); // CET / CEST
  while (time(nullptr) < 100000) delay(100);               // wait for NTP lock

  // More code is omitted here for simplicity

}
which asks two Network-Time-Protocol (NTP) sources, in order:
- pool.ntp.org – a global, community-run “time pool.” A DNS lookup picks one of thousands of volunteer servers that are geographically close and lightly loaded.
- time.nist.gov – the official server of the U.S. National Institute of Standards and Technology, a reliable fallback if the pool is unreachable.
Once the first NTP packet sets the clock, the ESP32’s software RTC keeps time on its own. That clock value is shown in the LCD header and, more importantly, provides the reference for each countdown: by subtracting the current RTC value from every scheduled departure the code can display “bus in 3 min” instead of a raw timestamp. A timer in the main loop triggers a fresh download every sixty seconds, so both the header clock and the countdowns remain accurate.
Live Bus Data
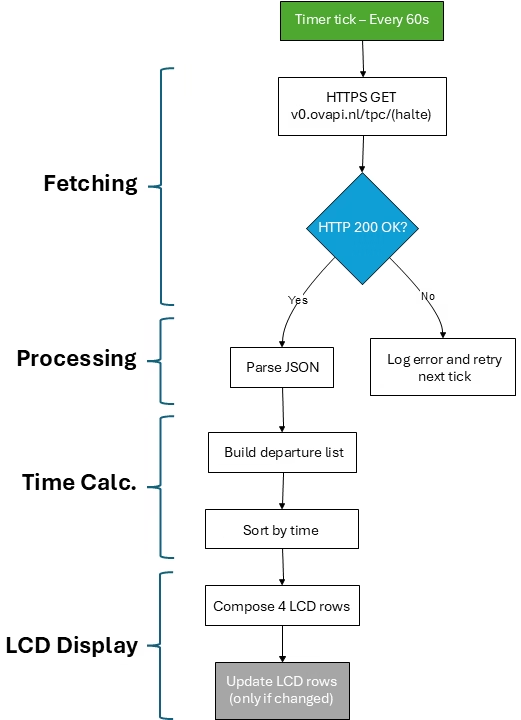
With Wi-Fi and the clock already sorted, the firmware drops into a tight one-minute cycle. Figure 4 breaks that cycle into four bite-sized stages: Fetching, Processing, Time calculation and LCD Display. Each will be discussed below.
Fetching
This helper fetches the OVapi payload as efficiently as possible. It starts with a Wi-Fi status check, so the ESP32 never attempts a network call when it is already offline. Because the server’s certificate chain can’t be verified on the ESP32, client.setInsecure() disables certificate validation and lets the TLS handshake complete. The Arduino HTTPClient class then handles the DNS lookup, TLS session, and HTTP framing in a single begin() call; if that call fails the function returns immediately to keep the main loop responsive. After sending the GET request the code accepts only an HTTP 200 response, treating anything else as an error. When the status is good the JSON body is copied into a String, the socket is closed, and the caller receives a clean payload ready for parsing.
bool fetchOVapiPayload(const String& halteCode, String& payloadOut) {
  /* ----- connectivity guard ------------------------------------------------ */
  if (WiFi.status() != WL_CONNECTED) {          // offline? abort immediately
    Serial.println("Wi-Fi not connected.");
    return false;
  }

  /* ----- open HTTPS connection -------------------------------------------- */
  WiFiClientSecure client;                      // TLS socket
  client.setInsecure();                         // skip certificate check

  HTTPClient http;                              // high-level helper
  String url = "https://v0.ovapi.nl/tpc/" + halteCode;
  if (!http.begin(client, url)) {               // initialise socket + URL
    Serial.println("HTTP begin() failed.");
    return false;
  }

  /* ----- issue GET and check status --------------------------------------- */
  int httpCode = http.GET();                    // perform GET /tpc/{halte}
  if (httpCode != HTTP_CODE_OK) {               // expect 200
    Serial.printf("HTTP error: %d\n", httpCode);
    http.end();                                 // always tidy up
    return false;
  }

  /* ----- success: HTTP Response ------------------------------------- */
  payloadOut = http.getString();                // JSON payload
  http.end();                                   // close connection
  return true;
}
JSON Processing
In updateOVapi() the first step is to call the helper that fetches the payload. When the JSON arrives it is fed to deserializeJson, which loads the text into an 8-kB DynamicJsonDocument. Eight kilobytes is large enough for the entire response yet small enough to stay within the ESP32’s RAM budget. If the parser complains—meaning the JSON is malformed—the function returns at once so no later code ever touches unfinished data. After validation the code extracts only the slice of data it needs with the following functions:
JsonObject halte = doc[tpc_code];— isolates your stop
Looks at the top-level JSON document and pulls out the single object whose key equals your halte code (e.g., “55000160”). Everything else in the API response is ignored from this point on.JsonObject passes = halte["Passes"];— isolates the trips
From that stop-specific object, drills down to its"Passes"member, which contains one child object per upcoming bus. This is the collection the loop will iterate over.
/* ------------------- updateOVapi(): one-minute task ------------------- */
void updateOVapi() {
  extern String tpc_code;                          // halte code chosen by user

  /* --- 1. download raw JSON ---------------------------------------- */
  String payload;
  if (!fetchOVapiPayload(tpc_code, payload)) {     // HTTPS GET
    Serial.println("Error fetching OVapi data.");
    return;                                        // try again next minute
  }

  /* --- 2. parse JSON into a document tree -------------------------- */
  DynamicJsonDocument doc(8192);
  if (deserializeJson(doc, payload)) {             // check parse error
    Serial.println("JSON parse failed");
    return;
  }
  JsonObject halte  = doc[tpc_code];
  JsonObject passes = halte["Passes"];             // all trips for this stop
/* continues below */
Expected Arrival Time Calculation
After the JSON tree is narrowed to the Passes section, the code flattens that nested data into a fixed-size array; a plain array scans faster, uses less RAM than a dynamic container, and is a lot easier to sort. In each iteration the loop takes the most authoritative timestamp—ExpectedDepartureTime if present, otherwise ExpectedArrivalTime. Entries with no timestamp or one that has already passed are discarded immediately, saving work later.
Only four fields—line number, destination, the original ISO time string (for reference), and the computed minutes-left value—are copied into the Departure struct, keeping each element lightweight. The array is capped at 50 items, a safety margin which I probably will never reach (but I keep it as safety precaution).
When the array is full, a simple bubblesort algorithm moves the earliest arrival to index 0. This algorithm isn’t efficient, but with so few elements it finishes in a few hundred microseconds, negligible in a loop that runs only once per minute. The outcome is a compact, time-ordered list of future departures, ready for the display routine.
/* --- 3. build a flat C++ array of departures --------------------- */
Departure departures[50];      // fixed-size buffer, more than enough for one stop
int      depCount = 0;         // how many elements we’ve actually stored
time_t   now      = time(nullptr);  // current epoch seconds for “minutes left”

for (JsonPair kv : passes) {               // step through every trip object
  JsonObject p = kv.value();

  /* ---- pick the best timestamp ---------------------------------- */
  const char* tijd = p["ExpectedDepartureTime"];   // preferred field
  if (!tijd) tijd = p["ExpectedArrivalTime"];      // fallback if departure missing
  if (!tijd) continue;                             // ignore records with no time

  long minLeft = (parseISO8601(tijd) - now) / 60;  // convert ISO → minutes left
  if (minLeft < 0) continue;                       // skip buses that already left

  /* ---- copy the fields we want into a plain struct -------------- */
  departures[depCount].line        = p["LinePublicNumber"];   // bus line “3”
  departures[depCount].destination = p["DestinationName50"];  // e.g. “Amsterdam CS”
  departures[depCount].time        = tijd;                    // original ISO string
  departures[depCount].minLeft     = minLeft;                 // whole minutes

  if (++depCount >= 50) break;  // safety cap: never overrun the array
}

/* --- 4. sort the array so index 0 is the soonest arrival -------- */
for (int i = 0; i < depCount - 1; ++i)
  for (int j = i + 1; j < depCount; ++j)
    if (parseISO8601(departures[j].time) < parseISO8601(departures[i].time))
      std::swap(departures[i], departures[j]);     // bubble-sort swap
LCD - Row 0 & WiFi display
The LCD initialization, its back-light, and the three custom Wi-Fi glyphs are set up only once. A static flag lets the very first call handle that work at power-up while every later call skips it.
lcd.clear() resets the screen so each refresh starts from a clean slate; because this runs just once a minute, the brief blanking is invisible to the eye.
WiFi.RSSI() is sampled each minute and mapped to three signal levels: stronger than –60 dBm shows three bars, –75 to –60 dBm shows two, and anything weaker shows one.
Row 0 carries the context line. Stop names are shortened with shortenHalteName() and hard-truncated to 13 characters so the two-digit time at column 14 and the Wi-Fi icon at column 19 always fit. The result is a tidy header including a stop name, two-digit clock, and connection-strength icon, all without scrolling.
/* ---------------- printLCD(): refresh 20×4 display ------------------ */
void printLCD(const String& halteNaam,
              const char*    tijdStr,
              Departure      departures[],
              int            depCount)
{
  /* initialise LCD on first call only */
  static bool lcdStarted = false;
  if (!lcdStarted) {
    lcd.init();                // I²C handshake + wake-up
    lcd.backlight();           // turn on back-light
    lcd.createChar(0, wifi1);  // custom Wi-Fi bars: 1-bar
    lcd.createChar(1, wifi2);  //                    2-bar
    lcd.createChar(2, wifi3);  //                    3-bar
    lcdStarted = true;
  }
  lcd.clear();                 // start fresh for this frame

  /* choose Wi-Fi strength icon based on RSSI */
  int32_t rssi = WiFi.RSSI();
  int wifiChar  = (rssi > -60) ? 2 : (rssi > -75) ? 1 : 0;

  /* ---------- row 0: stop name + current time + Wi-Fi bars ---------- */
  String row0 = shortenHalteName(halteNaam);     // compress long names
  if (row0.length() > 13) row0.remove(13);       // max 13 chars
  lcd.setCursor(0, 0);       lcd.print(row0);    // “Utr, turfmarkt”
  lcd.setCursor(14, 0);      lcd.print(tijdStr); // “12:34”
  lcd.setCursor(19, 0);      lcd.write(wifiChar);
   /* Continue below*/
LCD - Row 1 to 3
Rows 1-3 hold the live departures, but the display is only four lines tall, so the loop stops after it has printed three buses. Because the array is already time-sorted, simply walking it from the top guarantees the earliest trips appear first. Any entry whose minLeft has dipped below zero is skipped, preventing a bus that has just departed from lingering on the screen for a full minute.
Each line must fit in exactly twenty characters. To make that happen the destination is trimmed to eleven characters, the line number is left-padded to three, and the minutes-left field is formatted as a fixed four-character string such as “ 5m” or “15m”. snprintf assembles the pieces into a single buffer so the LCD receives one contiguous write, avoiding per-field flicker. The shown counter tracks how many valid rows have been printed and keeps the loop from overrunning the available screen rows
/* ---------- rows 1-3: up to three upcoming buses ------------------ */
  int shown = 0;
  for (int i = 0; i < depCount && shown < 3; ++i) {
    if (departures[i].minLeft < 0) continue;     // skip departures in past

    /* build one 20-char line: "73  Amsterdam  5m" */
    String lijn = departures[i].line;
    String dest = departures[i].destination;
    if (dest.length() > 11) dest.remove(11);     // trim to fit
    char row[21], mins[5];
    snprintf(mins, 5, "%2ldm", departures[i].minLeft);
    snprintf(row, 21, "%-3s %-10s %4s", lijn.c_str(), dest.c_str(), mins);

    lcd.setCursor(0, shown + 1);
    lcd.print(row);
    shown++;
  }
}
Conclusion
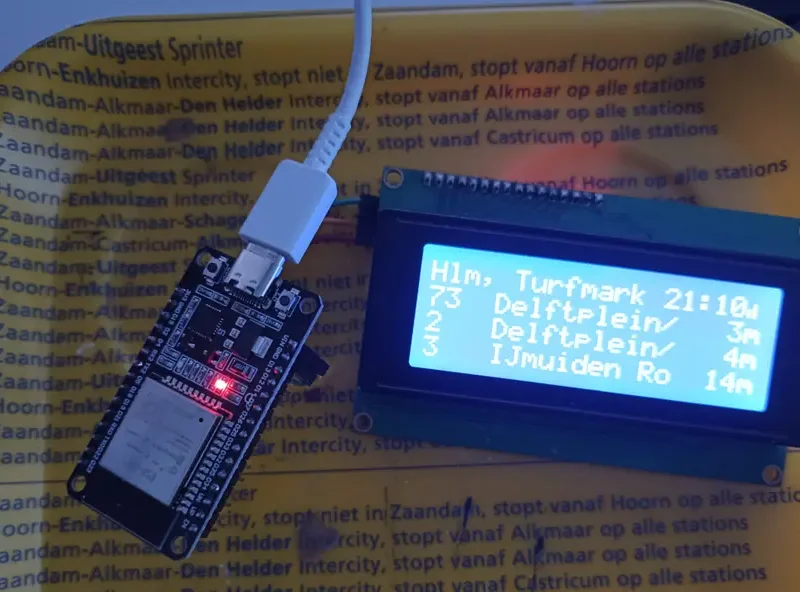
Figure 5 shows my own setup, connected to the wall plug, where it shows a random stop somewhere in the Netherlands. I’m happy with this result!
After-thoughts
I started this whole project because I wanted the arrival times for the bus stop near my house to on a screen on my desk, instead of having to open an app. Getting there took time and struggles, but seeing it work for the first time was totally worth it. While I waited for the ESP32 module to arrive, I wrote a quick-and-dirty Python script that did the same job on my laptop. Sure, I could have just used a website, but working on the script exposed headaches, like SSL-certificate issues, that I might have missed if I’d jumped straight to microcontroller code.
Once the board showed up, the early steps flew by because I’d already mapped out the structure in Python. C++ is a different language, but the overall flow was the same. After the basics worked I kept adding features: a header row for the LCD, custom Wi-Fi signal icons, little touches that made the gadget feel polished. WiFiManager came in when I told my coworkers, who jokingly said, “Make me one!” Hard-coding everyone’s SSID and password was a non-starter, so the portal lets anyone enter their own network and pick their own stop.
I’m thinking of adding a rotary encoder next, to scroll through more departures. The idea that I had was to be able to switch between bus and train data with the button switch of the encoder. Train times are more complicated (no real API out there), but my ESP32’s flash is already 89% full. I don’t think I’m close to 2MB, so not sure if its an issue on my side, or if I got a cheap knock-off with very little memory.
If you got ideas to slim my code down or have ideas on what else I should add? Let me know in the comments.
Florius
Hi, welcome to my website. I am writing about my previous studies, work & research related topics and other interests. I hope you enjoy reading it and that you learned something new.
More Posts